Wednesday, July 27, 2011

Boy Side or Girl Side?

I just finished my first quilt.

Insert happy dance here.

This was a project three years in the making. I first thought about doing it when I gave birth to Little Brother six years ago and started pulling out all the clothes that Big Brother had worn four years previously. I thought it would be neat to someday make a quilt out of my favorite outfits that they'd both worn.

And then, for the last three years I held out hope that I would have another child. Well, about eight months ago, I finally got to the point where I wasn't hoping for that anymore (hoping instead, dear God, puh-lease don't let me get pregnant again), and decided it was time to start cutting up the clothes. After I bought some new "tools," of course.


Now, I'm not going to give you any sort of tutorial, because I am NOT a seamstress. I made this quilt just like I make a lot of things: Decide what I want to do, jump in with both feet, eyeball things along the way, and hope they turn out. Instead, I'll just share the general gist of what I did.

Here are my squares.

I laid them all out...

Quite a few times...

Until I ran across this pattern, and decided I wanted to do something similar.

Here's my finished product (the boy side)

Then, on the other side (the girl side) I just pieced together a few really large pieces of material, most of which I already had on hand. I decided to do it completely different from the boy side, so that it would be more versatile.

Here's a close-up of some of the cut up shirts:

And the boys in some of those clothes (way back when).

Big Brother:

Little Brother:

Little Brother:

Big Brother:

So I kicked my old comforter - that used to be on the end of my bed - to the curb and replaced it with the new one. It's not perfect (FAR from it), but I made it, and it's got some great sentimental value to it. Can't beat that with a stick.

Tuesday, July 26, 2011

Sara's Medicine Cabinet

A couple months ago my friend Sara asked me to help her make a medicine cabinet for her bathroom. So I borrowed another friend's table saw (looove me some strong power tools - woot!) and we got to work.

She had this lovely mirror she found that she wanted to use as the front.


And we went to work crafting a box for the cabinet part. (Please ignore the fact that I'm not wearing protective eye gear. I never do. But you should. You definitely should. You can't tell, but I'm also barefoot. Is that a safety issue, too? I don't know, but I hate shoes. I only wear them when I absolutely have to. Sorry, rabbit trail).


Here's the final result hanging on her bathroom wall. Isn't it pretty? I love how it turned out!Once she got it home she attached the box to the wall, painted it silver, and hinged the mirror to the box.
Nice job, Sara! Thanks for letting me be part of the process!

Friday, April 8, 2011

Octopus Painting

Well, this isn't what I planned on blogging about today...
but actually I have no other plan.

I was waiting for inspiration to strike
and it never did.

But when Kim posted what she did on her blog two days ago.
I decided to just use that and run with it.

So just so you know (and if you don't want to go to her blog) she posted a room picture with an octopus triptych on the wall and in the comments wrote, "It's our octopus, Beth!"

Here's why she said that:

A little over a year ago I "fanned" Kim on Facebook, and not long after she posted this: "Why does the excellently funky octopus triptych (covet!) at Plantation Design cost $5k? I mean, really."

So I went on the Plantation Design website to see what she was talking about. Here's a picture:

Then the following facebook "conversation" ensued (click on it to make it bigger if you can't read it), thus beginning my contact with Kim (if any of you wondered how that happened):


I did repaint my boys' room, and gave them the ocean theme they wanted. And while I hadn't forgotten about the octopus, I didn't have time to really sit down and do anything about it until a couple months after that. My boys were all out fishing, and I figured it was now or never. It took me a good few hours - I watched the whole of Shindler's List while working on it - something else I can't exactly do while the boys are around.

All I had to purchase was a piece of white poster board and a tube of craft paint, so my cost for this project was probably only $2, as I already had the frame and white paint. Far cry from $5,000!

Here's how mine turned out:

A few more details, perhaps? The poster board was white. I divided it into three sections (I didn't cut it, just drew two lines separating each third). Then I found the octopus image on Google, printed it out, and looked at that as a guide for drawing an outline of the octopus on the paper. Then I simply painted the negative space blue and used the same blue to outline/fill in some of the stuff on the octopus, like the mark on his head and his eyes.

Once that was done, I needed to do the suction cups. I really had no idea how to do this other than knowing they had to be round! I ended up using a q-tip to make dots on the octopus' tentacles with the dark blue, and then I added a little white to the blue and went over all the circles again with the lighter blue. This gave them depth. I would like to say, "And voila!" but it really wasn't that simple. I mean, it sounds simple, but I am really not a paper-and-paint artist. I usually can't draw to save my life (hence the octopus from Google that I used as a guide). This project ended up the way it did due to a lot of luck.


And my boys loved it. And I have to admit I was also quite pleased with it. And when I emailed it to Kim, she did as well, which was really nice. She even featured it on her blog - a super exciting thing to me that I certainly wasn't expecting.

And that was the beginning of Kim inspiring me. It hasn't stopped yet!

Monday, February 28, 2011

Straight As An Arrow

He loves thieves. More for the planning aspect than anything. He is intrigued with "the best laid plans of men." As he told me one day when he was in second grade and talking about the Greek god Hermes: "He was the god of trade, travel, and theft. He's my favorite. Well, not that thieves are my favorite, but I'm a big fan of having to plan things out. And thieves have to do that. Like, they have to figure out who's going to hold the walkie-talkie so they can say, 'OK, open the door,' when they get somewhere, and things like that."

So it came as no surprise that when third grade rolled around, and he had to dress the part of a Middle Ages character, he chose another thief - albeit one with a good purpose - Robin Hood (though now he claims he's "just an archer").

What did come as a surprise was the fact that I was able to make half of his costume. The tunic, the hat, the bow and arrows (which he decorated). While I will never in a million years be able to explain the happy sewing mistakes of actually pulling together an acceptable tunic and hat, the arrows are fairly straightforward. Here's how you can make your own - for your kids to use, or for your own interesting decor.


Materials Needed:
Scissors
Colored electrical tape (found mine at Walmart)
pencil erasers (found mine at Walmart)
dowels that fit into said erasers (found mine at Home Depot)
feathers (found mine at JoAnne Fabrics)

Step One: cut short lengths of tape and wrap them around the dowels at intervals. How many colors you use on each dowels is up to you.

Step Two: Cut a small niche in the top of each eraser and put one on the end of each dowel.

Step Three: decide on your feather combination. Cut one half of each feather off so they sit against the dowel, gather them together, and tape them to each dowel.

Step Four: stick the other end into a pencil sharpener and sharpen to a dull point.
Step Five: pretend your day away.

Thursday, February 24, 2011

Just Smashing

It's not very often that pictures of knick-knacks catch my eye. Usually I am more drawn towards rooms as a whole rather than the individual items that are in the room. But because my tastes have just a bit of an eclectic and whimsical bent to them, occasionally I'll see something that grabs my attention. That's what happened a couple weeks ago when I saw this display on a blog or site somewhere (I never remember where I get my pictures from - gotta do better with that).


I was drawn toward a few elements about it - the grouping of boxes, the items they placed in the boxes, and the contrast between the paper or fabric inside and the natural wood outside. I never set out to recreate something like this, partly because I've learned that that's impossible and partly because, in this case, something like this just wouldn't really "fit" in my house.

But what I will do is keep the idea in mind, mulling over whether or not I could do something similar. In this case, my favorite parts of the vignettes were the animal head and the branch vase. I know Anthropolgie is selling white animal heads right now for $20, but, as I said, even though I like this, I'm not trying to recreate it. So they will stay at Anthropologie.

However, something at the thrift store did catch my eye a few weeks ago. I saw this:

Wow, right? Not something that exactly screams "great home decor" to me. In fact, I never would have looked twice at it before, but now I was wondering if I couldn't make a vase with that tree.

So I paid the pittance they wanted for it, brought it home, and took a hammer to it. Because the bear had to go.

The tree also got a little smashed, seeing as how it was joined at the hip with Grizzly, but it wasn't anything a little glue wouldn't fix. Well, sort of. Here is the back of it, all glued together and painted white (although I'm currently contemplating silver). Not very usable, right? But never fear, my pennies weren't wasted.

Because here's the other side of it. Broken side turned toward the wall and no one is the wiser.

At first I was thinking it would just stay like that. Just looking pretty, but not being very useful. Form without function. But after I did all the repair work and painting I remembered I had this little tiny vase. And it fits perfectly into the tree.
Voila!

Off to find some flowers...

Wednesday, February 9, 2011

Delighted - The Phone Call


There are times in life when I've been completely delighted by people I know. By the decisions they make or the kinds words they say or deeds they do. My children delight me constantly. At this time in the life of our family I find myself being delighted by my five year old trying to sound out words to a story and my nine year old be delighted himself by the beauty he notices around him.

And of course there are occasional stories of strangers I hear about that delight me, as I'm sure you do. But I want to share with you an experience I had last week where I was personally delighted by someone new. You may remember how I was not crazy about the brown panels and border I painted in my bedroom (if not, you can reread this post).

So I decided to email Kim Myles (read what I wrote about her here. Visit her blog here) and see if she would be willing to give me some advice, especially since it was one of her rooms I was trying to do something similar to.

And I was - yes - delighted. Not only did she take a look at the pictures of my room and offer some advice on my blog, but evidently decided it would be easier to just talk to me about it. So she called me. And she was delightful.

I won't go into every single detail here, but she did give me some advice that I am happily following - albeit slowly, in order to prevent injury, partly because I'm still nursing a shoulder dislocation injury that's giving me grief 6+ months later. The biggest things she said to do were to 1) make the border on the top of the walls bigger, and also add a border to the bottom, and 2) paint my ceiling. I have been wanting to paint my ceiling for probably about six months now. I guess I just needed a professional to push me off the edge.

So thanks for the push, Kim (and for waving your usual fee). :) I think maybe I'm going to switch to a first-name basis now. Is that ok?

*Image from DesignSponge

Monday, January 3, 2011

It All Started With A Hunt For A Couch

One of my, er...hobbies, I guess you could say...that goes in spurts
is looking at decorating magazines and books.
I'll get really into them for a while, then not look at them for weeks,
like waves of the sea.
During one point in my life a few years ago, I was in desperate need of a new couch.
This is what we were living with.

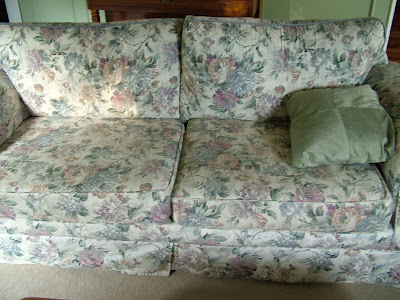
Laugh if you will. It's ok.
I would too if I weren't crying about it.
Actually, I had very good reasoning for buying that couch.
I was pregnant.
No, pregnancy does not cause mental reasoning issues (although some would argue it does). Instead, my reasoning was, "We can have any number of kids spilling any substance known to man on this couch, and no one would know."

I don't live with that couch anymore
(although it's younger brother, the love seat, has yet to move out.
Maybe I'll share that story later in the week).

Back from the rabbit trail...

One of the things I did while trying to find a new couch was
get some design books from our library so
I could look at a bunch and kind of get a feel for what style of couch I wanted.
One of the books I brought home has become one of my favorite books of all time.
It's called The Not So Big House, by Sarah Susanka.
What I didn't know at the time is that this book has nothing to do with interior decorating. Susanka is an architect and speaker,
and this book is all about how to live in smaller but better built spaces.


After reading it,
and not being able to find a couch I liked for close to a year,
I decided to take the money I'd been planning to purchase a sofa with and instead
do something to make our house better for us.
I contemplated what that could be for a while,
then landed on the idea that we could really use some new book cases.
We had one, and it was fairly small.
We kept giving books away because we'd run out of room for them.

I wanted to build them on either side of our window seat,
but was unsure how due to a lot of chair rail/trim around it.
So asked the advice of a carpenter couple I knew,
who suggested I build them up off the floor and around the existing chair rail
so that if they were ever removed,
the room would still be cosmetically pleasing and not require any work other than
patching some holes.

So I headed to Home Depot and bought some wood and nails and such.
Then I headed to a friend's house to borrow his table saw and chop saw.
And over one weekend,
I knocked out two rectangular book cases
(and, believe me, prayed every time I cut a piece of wood).
It was amazing that my first attempt at building anything that large
(I have a scroll saw, and had done lots of little projects with it)
turned out perfectly.

Of course, there are a few more details to it than that,
but because there are probably few people out there who would run into
the same chair-rail-issues I have, I'll spare you.
But I wanted to share this with you because I learned a lot from it.
I learned that you never know what you can do until you try and
that if I think something is doable, just {go for} it -
It may just work out wonderfully.
I also learned that, no matter your age, you CAN learn new skills.
So check out Susanka's book if you're up for an interesting read.

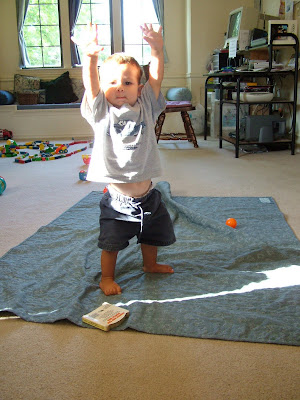
I wish I had a good "before" picture to show you.
Unfortunately, I forgot to take one, so all I have to show people are
old photos with the "before" in the background,
like this one on Little Brother's first time walking.


Building those book cases is probably the singular thing I've done
to my house that's brought me the greatest pleasure.
All because I decided to just {go for} it.

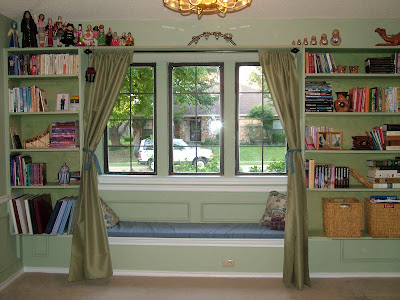
(The shelves actually look drastically different now than in this photo, but I'm too lazy to clean up the area to take new ones. I have very few tchotchkes on/above them now, and our book collection has grown. There's also a different colored cover on the window seat cushion, and different pillows. Oh, and new windows. You can see a bit of that in the photo below).


But it didn't just add bookshelves.
It also enclosed the window seat even more,
making it almost seem like it's own little room.
Its coziness-factor rose by one hundred percent,
and now it gets used much more often.
People are drawn to sit there.

Anyway, on this Just {Make} It Monday, and
from one just {try} it person to (hopefully) others,
here's to many just-{go-for}-it moments in 2011!